OPERATOR’S MANUAL
QUICK CHANGE UTILITY KNIFE
MANUEL D’UTILISATION
COUTEAU UTILITAIRE À CHANGEMENT
DE LAME RAPIDE
MANUAL DEL OPERADOR
CUCHILLO UTILITARIO DE CAMBIO
RÁPIDO
A24NK05
A - Rotary blade cartridge (cartouche rotative de
lame, cartucho de cuchillas rotatorio)
B - Blade tip (pointe de lame, punta de la hoja)
C - Light gray lock button (bouton de verrouillage
gris clair, botón del seguro gris claro)
D - Dark gray lock button (bouton de verrouillage
gris foncé, botón del seguro gris oscuro)
E - Knife body (corps du couteau, cuerpo del
cuchillo)
F - Lock area (zone de blocage, zona de bloqueo)
G - Unlock symbol (symbole de deverrouillage,
símbolo para abrir)
H - End cap (bouchon d’extrémité, tapa del extremo)
I - Notches (enchoches, muescas)
WARNING: Always wear eye protection with side
shields marked to comply with ANSI Z87.1. Failure to
do so could result in objects being thrown into your
eyes, resulting in possible serious injury.
AVERTISSEMENT : Toujours porter une protection
oculaire avec écrans latéraux certifiée conforme à la norme
ANSI Z87.1. Le non respect de cette règle peut faire en
sorte que des liquides soient projetés dans vos yeux, ce
qui peut entraîner des blessures graves
CALIFORNIA PROPOSITION 65
WARNING: This product may contain chemicals,
including lead, known to the State of California to
cause cancer, birth defects or other reproductive
harm. Wash hands after handling.
PROPOSITION 65 DE L’ÉTAT DE CALIFORNIE
AVERTISSEMENT : Ce produit peut contenir des
produits chimiques, notamment du plomb qui, selon l’État
de la Californie, peuvent causer le cancer, des anomalies
congénitales et d’autres dommages au système reproducteur.
Bien se laver les mains après toute manipulation.
PACKING LIST: Utility Knife, Rotary Blade Cartridge,
Holster, and Operator’s Manual
LISTE DE CONTRÔLE D’EXPÉDITION : couteau
utilitaire, cartouche rotative de lame, étui, et manuel
d’utilisation.
ONE WORLD TECHNOLOGIES, INC.
1428 Pearman Dairy Road, Anderson, SC 29625
Phone/ Téléphone/ Teléfono 1-800-525-2579
www.ryobitools.com
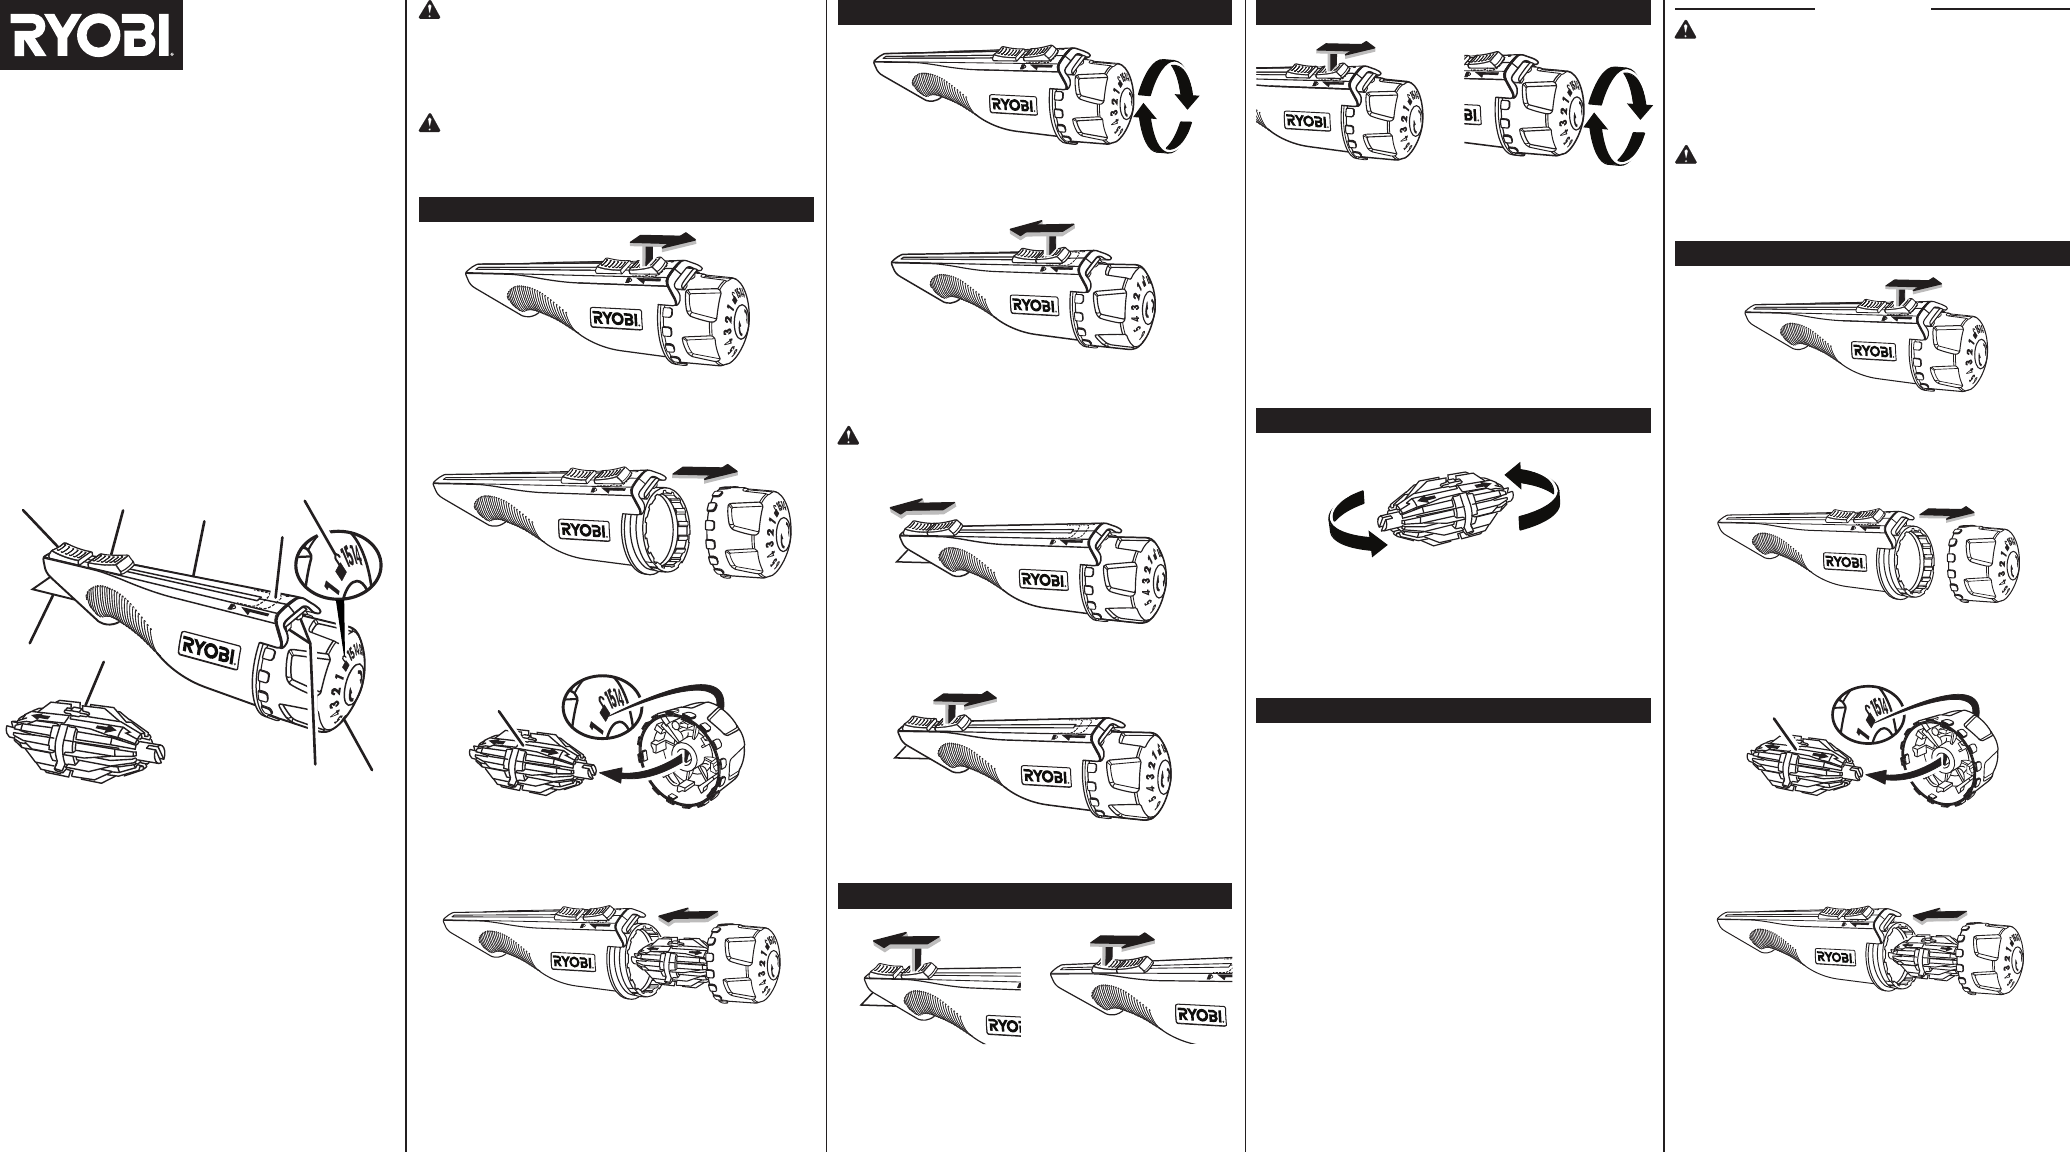
INSTALLING / REMOVING CARTRIDGE
INSTALLING BLADE CHANGING BLADE
RETRAIT / INSTALLER CARTOUCHE
REVERSING CARTRIDGE
TROUBLESHOOTING
UNLOCKING / RETRACTING BLADE
1. Slide dark gray lock button to rear lock position.
It is in rear lock position when seated completely
over lock area. It must be in this position to install
or remove blades or to turn end cap.
1. Glisser le bouton de verrouillage gris foncé vers la
position de verrouillage arrière. Il est dans cette position
de verrouillage lorsqu’il recouvre complètement zone
de blocage. Il doit être dans cette position chaque
fois que vous retrait / installer des lames ou que vous
tournez le bouchon d’extrémité.
NOTE: The cartridge is made with different colored
ends to help remind you which end you’ve already used.
NOTE : Les extrémités de la cartouche sont de deux
couleurs différentes afin de vous aider à vous rappeler
quelle extrémité vous avez déjà utilisée.
2. Rotate the end cap so the unlock symbol is
between the notches on the knife body. Remove
end cap from the knife body by pulling in the
direction shown.
2. Tourner le bouchon d’extrémité de sorte que le
symbole de deverrouillage est entre les enchoches sur
le corps du couteau. Enlevez le bouchon d’extrémité
du corps du couteau en le tirant dans le sens indiqué.
3. Remove the cartridge wrapper. Align the end cap
and cartridge by lining up the gap on the cartridge
with the unlock symbol on end cap and pushing
one end of cartridge into end cap.
3. Enlever l’embollage de la cartouche. Aligner le
bouchon et une cartouche en alignant l’espace vide
sur la cartouche avec el symbole de deverrouillage
sur le bouchon et en poussant une extrémité de la
cartouche dans le bouchon.
4. Rotate the end cap so the unlock symbol is
between the notches on the knife body. Push end
cap and cartridge into knife body.
4. Tourner le bouchon d’extrémité de sorte que le
symbole de deverrouillage est entre les enchoches sur
le corps du couteau. Poussez bouchon et cartouche
dans le corps du couteau.
6. Slide dark gray and light gray lock buttons
forward at the same time. A blade is now ready to
be moved out of the knife.
WARNING: Keep hands away from blade tip and
cutting area. Failure to do so could result in possible
serious injury.
7. Push dark gray and light gray lock buttons
forward until blade is at desired depth. There are
six possible positions.
5. Rotate end cap clockwise so no. 1 on cap is
between the notches on knife body.
8. Lock blade in place by pulling back on dark gray
lock button until it clicks. The knife is ready to use.
9. Unlock blade by
carefully pushing
dark gray lock button
forward to meet the
light gray lock button.
10. With thumb on light
gray lock button, pull
both lock buttons
completely back to
end of knife body.
11. To change blade: pull
dark gray lock button
until it is completely
seated over lock
area.
12. Rotate end cap one
turn clockwise. The
no. 2 should now
be lined up with
indicator point on
knife body. Repeat
these last two steps
each time a new
blade is desired.
NOTICE: NEVER turn end cap unless dark gray lock
button is in this position. Damage to the knife could
occur.
1. End cap and cartridge cannot be placed into
knife body — Gap on cartridge is not properly
aligned with unlock symbol on end cap (see step
3).
2. End cap will not turn — Dark gray lock button is
not in locked position (see step 1).
3. No blade appears when lock buttons are in
correct positions — You have returned to starting
position and all blades in cartridge have been
used on that end.
4. Gray lock button will not move forward or
backward — Dark gray lock button is in locked
position and must be disengaged by pushing it
toward light gray lock button (see step 6 or 10).
5. End cap cannot be removed from knife body —
Dark gray lock button is not in rear lock position
and indicator points on end cap and knife body
are not lined up.
13. To use other end of blade cartridge, rotate the
end cap so the unlock symbol is between the
notches on the knife body. Remove end cap and
cartridge from knife body. Then place opposite
end of cartridge into end cap. Repeat steps 4
thru 8.
LISTA DE EMPAQUETADO: cuchillo utilitario, cartucho
de cuchillas rotatorio, funda, y manual del operador
A
B
H
I
E
F
G
D
C
1
2
1
2
Gap
1
2
1
2
1
2
Espace
1
2
Français
 Manymanuals.com
 Manymanuals.de
 Manymanuals.fr
 Manymanuals.it
 Manymanuals.pl
 Manymanuals.cz
 Manymanuals.es
 Manymanuals-pt.com
Commentaires sur ces manuels