Ryobi P551 Manuel de l'opérateur
Naviguer en ligne ou télécharger Manuel de l'opérateur pour Scies circulaires Ryobi P551. Ryobi P551 Operator`s manual Manuel d'utilisatio
- Page / 32
- Table des matières
- MARQUE LIVRES
- OPERATOR’S MANUAL 1
- TABLE OF CONTENTS 2
- INTRODUCTION 2
- WARRANTY 2
- GENERAL SAFETY RULES 3
- SPECIFIC SAFETY RULES 4
- WARNING: 6
- CAUTION: 6
- GLOSSARY OF TERMS 7
- FEATURES 10
- TOOLS NEEDED 10
- LOOSE PARTS LIST 11
- ASSEMBLY 12
- OPERATION 20
- ADJUSTMENTS 28
- MAINTENANCE 30
Résumé du contenu
SAVE THIS MANUAL FOR FUTURE REFERENCEYour miter saw has been engineered and manufactured to our high standard for dependability, ease of operation, an
104533.930151234567FEATURESSWITCH TRIGGERSee Figure 4.The saw will not start until you depress the switch lock with your thumb then squeeze the switch
11LOOSE PARTS LISTFig. 6WARNING:The use of attachments or accessories not listed might be hazardous and could cause serious personal injury.The follow
12ASSEMBLYWARNING:To prevent accidental starting that could cause serious personal injury, always remove the battery pack from the tool when assemblin
1345ASSEMBLYWARNING:Always make sure the compound miter saw is securely mounted to a workbench or an approved workstand. Failure to heed this warning
1445ASSEMBLYWORK CLAMPSee Figure 10.The work clamp provides greater control by clamping the workpiece to the fence. It also prevents the workpiece fro
1512345674531.63022.51501522.53031.645304515033.9ASSEMBLYTO INSTALL/REPLACE THE BLADESee Figures 11 - 12.WARNING:A 7-1/4 in. blade is the maximum blad
16ASSEMBLYFig. 13view of Miter tabLe square with fence Miter Lock LeverMiter tabLethroat pLatefraMing squareNOTE: Many of the illustrations in this ma
17453031.622.5150153022.531.645ASSEMBLYSQUARING THE BLADE TO THE FENCESee Figures 16 - 19. Remove the battery pack from the tool. Pull the saw arm
Miter tabLeMiter tabLeMiter tabLecoMbination squarecoMbination squarecoMbination squarebeveL Lock knobbeveL Lock knobbeveL Lock knobMiter fenceMiter f
1945ASSEMBLYDANGER:Laser radiation. Avoid direct eye contact with light source.WARNING:Use of controls or adjustments or performance of pro-cedures ot
2 Introduction ...
20OPERATIONWARNING:Do not allow familiarity with tools to make you care-less. Remember that a careless fraction of a second is sufficient to inflict s
452145OPERATIONFig. 26work cLaMpcross cutBATTERY PROTECTION FEATURESRyobi lithium-ion batteries are designed with features that protect the lithium-io
224512345304515033.9OPERATIONbeveL scaLescaLe indicatorFig. 29work cLaMpbeveL cutindicator pointFig. 28indicator screwbeveL Lock knob Align cutting
2345OPERATIONFig. 30work cLaMpcoMpound Miter cutFig. 3145° x 45° coMpound Miter cut Before turning on the saw, perform a dry run of the cutting ope
24450OPERATION Place the workpiece flat on the miter table with one edge securely against the fence. If the board is warped, place the convex side a
25OPERATION4 PITCH OF SIDENUMBER OF SIDES0°6M- 45.00°B- 0.00°5°10°15°20°25°30°35°40°45°50°55°60°65°70°75°80°85°90°578 910M- 36.00°B- 0.00°M- 3
26OPERATIONWhen setting the bevel and miter angles for compound miters, remember that the settings are interdependent; changing one angle changes the
27OPERATIONWARNING: To avoid a kickback and to avoid serious personal injury, never position the concave edge of bowed or warped material against the
28ADJUSTMENTSWARNING:To prevent accidental starting that could cause serious personal injury, always remove the battery pack from the tool when assemb
2912345304515033.9ADJUSTMENTSDANGER:Laser radiation. Avoid direct eye contact with light source.WARNING:Use of controls or adjustments or performance
3GENERAL SAFETY RULESWARNING: Read and understand all instructions. Failure to follow all instructions listed below, may result in electric shock, fir
30MAINTENANCEWARNING:When servicing, use only identical replacement parts. Use of any other parts may create a hazard or cause product damage.WARNING:
31NOTES
988000-22411-2-10 (REV:01)OPERATOR’S MANUAL7-1/4 in., 18 Volt CordlessCompound Miter SawP551 • SERVICENow that you have purchased your tool, should a
4GENERAL SAFETY RULESSPECIFIC SAFETY RULES FIRMLY CLAMP OR BOLT the tool to a workbench or table at approximately hip height. KEEP HANDS AWAY FROM
5SPECIFIC SAFETY RULES NEVER hand hold a workpiece that is too small to be clamped. Keep hands clear of the cutting area. NEVER reach behind, unde
6SYMBOLSSome of the following symbols may be used on this tool. Please study them and learn their meaning. Proper interpretation of these symbols wil
7GLOSSARY OF TERMSPush Blocks (jointer planers)Device used to feed the workpiece over the jointer planer cutterhead during any operation. This aid hel
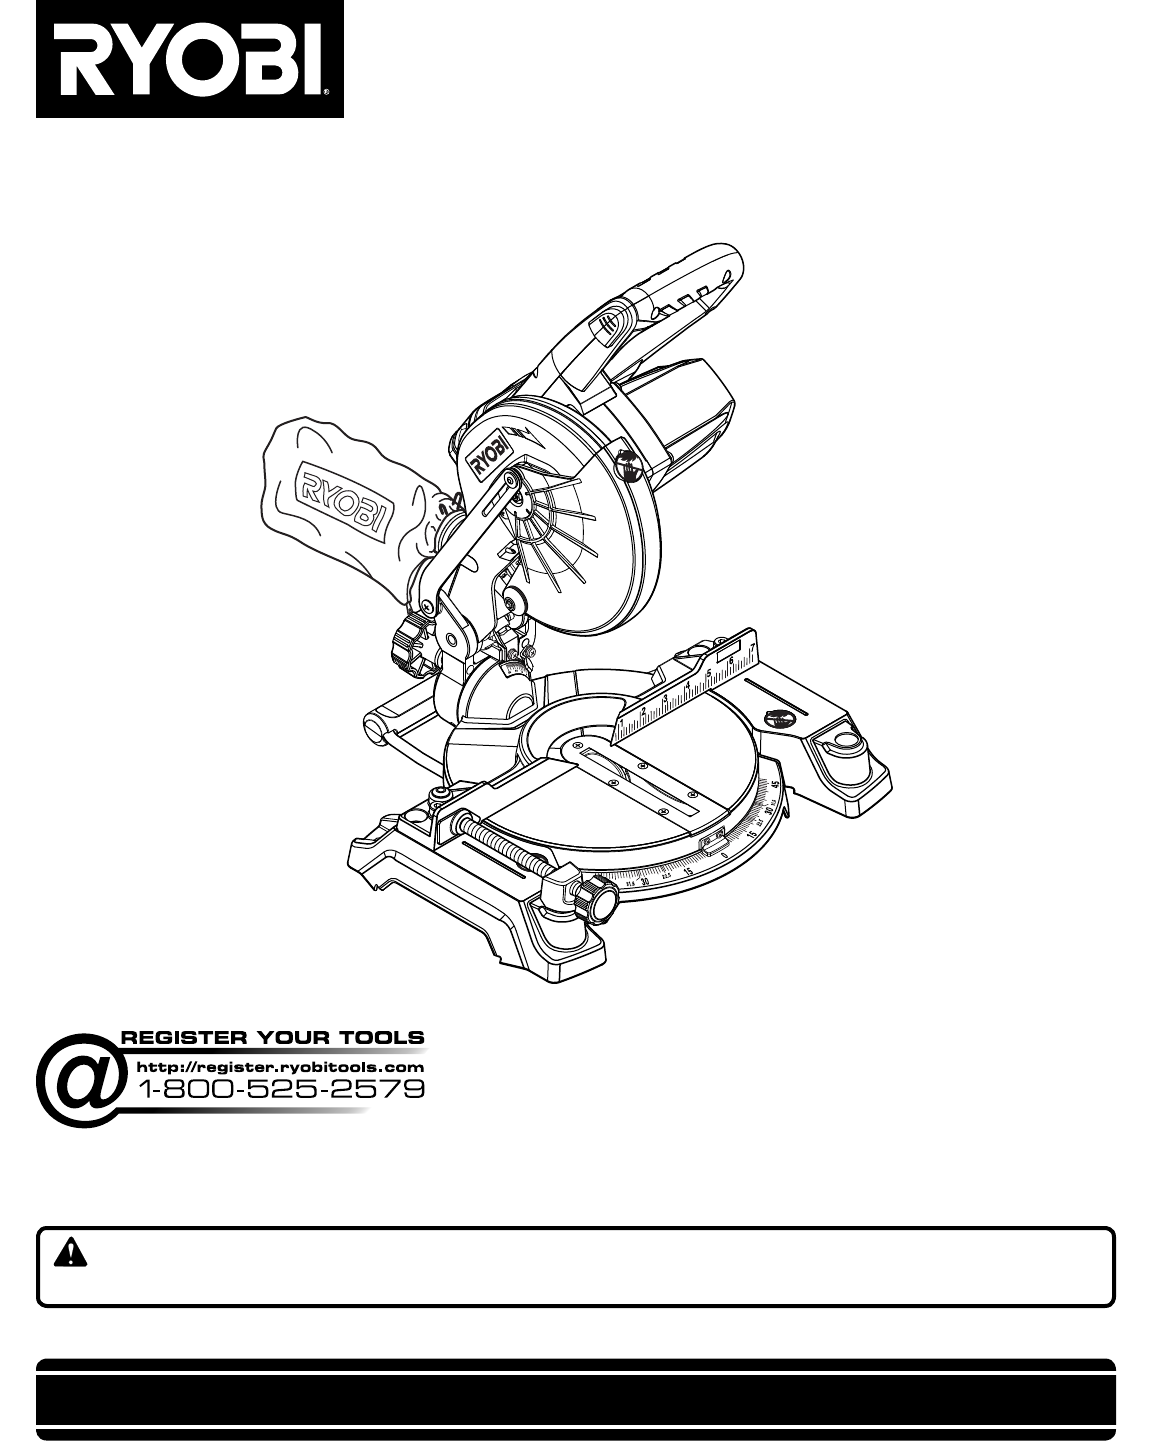
845FEATURESFig. 1PRODUCT SPECIFICATIONSArbor ...... 5/8 in.Blade Diameter ...
94533.930151234567FEATURESFig. 3KNOW YOUR COMPOUND MITER SAWSee Figure 1.The safe use of this product requires an understanding of the information on
Produits connexes et manuels pour Scies circulaires Ryobi P551
 (16 pages)
 (40 pages)
© 2020, manymanuals.fr. Tous droits réservés | 0.949 s |
 Manymanuals.com
 Manymanuals.de
 Manymanuals.fr
 Manymanuals.it
 Manymanuals.pl
 Manymanuals.cz
 Manymanuals.es
 Manymanuals-pt.com
Commentaires sur ces manuels