Ryobi RY43200 Manuel de l'opérateur
Naviguer en ligne ou télécharger Manuel de l'opérateur pour Outils électriques Ryobi RY43200. Ryobi RY43200 Operator`s manual Manuel d'utilisatio
- Page / 68
- Table des matières
- MARQUE LIVRES
- OPERATOR’S MANUAL 1
- TABLE OF CONTENTS 2
- INTRODUCTION 2
- IMPORTANT SAFETY INSTRUCTIONS 3
- SPECIFIC SAFETY RULES 4
- WARNING: 6
- CAUTION: 6
- Page 7 — English 7
- ELECTRICAL 8
- ASSEMBLY 10
- FEATURES 10
- OPERATION 12
- MAINTENANCE 16
- CALL US FIRST 22
- LIMITED WARRANTY STATEMENT 23
- AVERTISSEMENT : 24
- LIRE TOUTES LES INSTRUCTIONS 24
- Page 4 — Français 25
- Page 5 — Français 26
- SYMBOLES 27
- CARACTÉRISTIQUES ÉLECTRIQUES 29
- CARACTÉRISTIQUES 30
- ASSEMBLAGE 31
- UTILISATION 33
- ENTRETIEN 37
- NOUS APPELER D’ABORD 43
- ÉNONCÉ DE LA GARANTIE LIMITÉE 44
- Page 24 — Français 45
- ADVERTENCIA: 46
- LEA TODAS LAS INSTRUCCIONES 46
- Página 4 — Español 47
- Página 5 — Español 48
- SÍMBOLOS 49
- CARACTERÍSTICAS 52
- INSTALACIÓN DE LA MANGO 54
- DELANTERO 54
- FUNCIONAMIENTO 55
- MANTENIMIENTO 59
- LLÁMENOS PRIMERO 65
- Página 23 — Español 66
- Página 24 — Español 67
- PROPOSITION 65 DE L’ÉTAT 68
- DE CALIFORNIE 68
- CALIFORNIA - PROPUESTA 68
- DE LEY NÚM. 65 68
Résumé du contenu
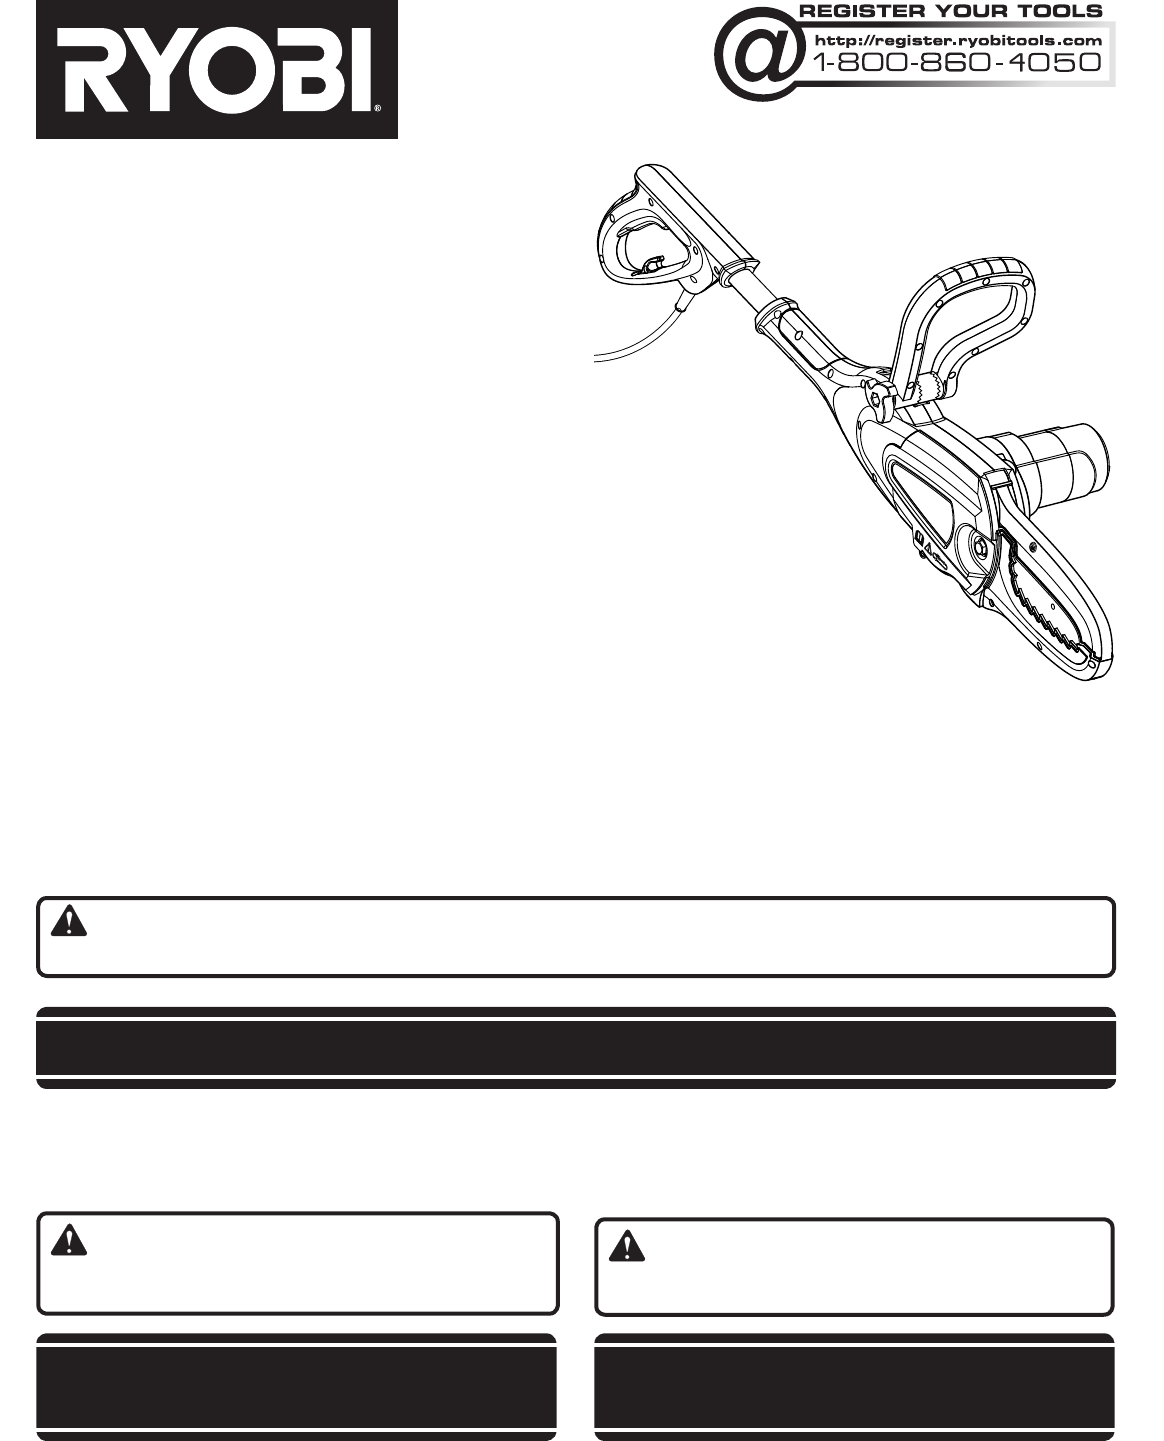
OPERATOR’S MANUALMANUEL D’UTILISATIONMANUAL DEL OPERADOR8 in. ELECTRIC LOPPERÉBRANCHEUR ÉLECTRIQUE DE 203,2 mm (8 po)TIJERAS DE PODAR ELÉCTRICAS DE
Page 10 — EnglishUNPACKINGThis product requires assembly. Carefully remove the product and any acces-sories from the box. Make sure that all items l
Page 11 — EnglishASSEMBLYINSTALLING FRONT HANDLESee Figures 3 - 4.Install the front handle so that the short side of the handle is on the same side a
Page 12 — EnglishCHAINLUBRICANTFig. 5OIL RESERVOIR CAPQUICK VIEW OIL INDICATORDANGER:Never cut near power lines, electric cords, or other electric so
Page 13 — EnglishWipe off excess lubricant.Check and fill the oil tank when quick view oil indicator is below the MIN indicator line.Repeat as
Page 14 — EnglishHOLDING THE LOPPERSee Figure 7.The unit has both a front and rear handle. With the blade directed away from you, hold the unit by bo
Page 15 — English Do not cut from a ladder, rooftop, or other unstable support; this is extremely dangerous. Leave larger cutting operations for pr
Page 16 — EnglishWARNING:When servicing, use only identical replacement parts. Use of any other parts could create a hazard or cause product damage.W
Page 17 — EnglishMAINTENANCE Chain must be re-tensioned whenever the flats on the drive links hang out of the bar groove as shown in fig. 12. D
Page 18 — EnglishMAINTENANCERemove the old chain from the bar.Lay out the new saw chain in a loop and straighten any kinks. The cutters should fa
Page 19 — English CHAIN OILERSee Figure 18.Use Premium Bar and Chain Lubricant. It is de-signed for chains and chain oilers and is formu-lated to per
Page 2 Introduction ...
Page 20 — EnglishMAINTENANCEHOW TO SHARPEN THE CUTTERSSee Figures 20 - 23.Be careful to file all cutters to the specified angles and to the same leng
Page 21 — EnglishSIDE PLATE ANGLESee Figure 25. CORRECT - 80° Produced automatically if cor-rect diameter file is used in file holder. HOOK - “Grab
Page 22 — EnglishPROBLEM CAUSE REMEDYBar and chain running hot and smoking.Check chain tension for overtightened condition.Oil reservoir empty.Tens
Page 23 — EnglishWARRANTYLIMITED WARRANTY STATEMENTTechtronic Industries North America, Inc., warrants to the original retail purchaser that this RYO
Page 3 — FrançaisAVERTISSEMENT :Lire et veiller à bien comprendre toutes les instructions. Le non-respect des instructions ci-dessous peut entraîner
Page 4 — Françaisseulement d’une façon. Si la fiche ne peut pas être branchée complètement dans le cordon d’extension, renversez la fiche. Si la fich
Page 5 — FrançaisPour éviter les risques d’électrocution, ne pas travailler à moins de 15 metres (50 pi) de lignes électriques.Avant de lancer l
Page 6 — FrançaisLes termes de mise en garde suivants et leur signification ont pour but d’expliquer le degré de risques associé à l’utilisation de c
Page 7 — FrançaisCertains des symboles ci-dessous peuvent être utilisés sur le produit. Veiller à les étudier et apprendre leur signification pour as
Page 8 — FrançaisAvant d’utiliser un cordon prolongateur, vérifier que ses fils ne sont ni détachés ni exposés et que son isolation n’est ni coupée,
Page 3 — EnglishWARNING:Read and understand all instructions. Failure to follow all instructions listed below may result in electric shock, fire, and
Page 9 — FrançaisCARACTÉRISTIQUESAPPRENDRE À CONNAÎTRE L’ÉBRANCHEUR ÉLECTRIQUEVoir la figure 2.L’utilisation sûre de ce produit exige une comprehensi
Page 10 — FrançaisLISTE DE CONTRÔLE D’EXPÉDITIONÉbrancheur électriquePoignée avantClé mixteManuel d’utilisationAVERTISSEMENT :Si des pièces manquent
Page 11 — FrançaisASSEMBLAGEINSTALLATION DE LA POIGNÉE AVANTVoir les figures 3 et 4.Installer la poignée avant de manière à ce que le côté court de l
Page 12 — FrançaisBOUCHON DE RÉSERVOIR D’HUILEREGARD DE NIVEAU D’HUILEDANGER :Ne jamais effectuer de coupes près de cerca de lignes, lignes cordon
Page 13 — FrançaisNOTE : L’ébrancheur sort d’usine sans guide et sans huile de chaîne ajoutée. La quantité devrait être vérifiée à tous les 20 minute
Page 14 — FrançaisMANIPULATION DE L’ÉBRANCHEURVoir la figure 7.L’outil comporte une poignée avant et une poignée arrière. Tenir l’outil par les deux
Page 15 — Français Les branches peuvent tomber dans une direction imprévue. Ne jamais se tenir directement au-dessous d’une branche en train d’être
Page 16 — FrançaisAVERTISSEMENT :Utiliser exclusivement des pièces d’origine pour les réparations. L’usage de toute autre pièce pourrait créer une si
Page 17 — FrançaisENTRETIEN NOTE : Une chaîne froide est correctement tendue lorsqu’elle ne présente pas de mou au-dessous du guide et qu’elle es
Page 18 — FrançaisENTRETIEN Tirer complètement la poignée avant vers l’arrière et appuyer sur le bouton de verrouillage de la mâchoire inférieure. M
Page 4 — EnglishDo not abuse the cord. Never use the cord to carry the product or to disconnect the plug from an outlet. Keep cord away from heat,
Page 19 — Français Refermer la mâchoire inférieure en tirant la poignée avantvers l’arrière tout en permettant à la poignée de se déplacer complètem
Page 20 — FrançaisCOMMENT AFFÛTER LES DENTSVoir les figures 20 à 23.Veiller à limer toutes les dents aux angles spécifiés et à la même longueur, car
Page 21 — Français PLUS DE 30° - Tranchant aminci, s’émousse rapidement.ANGLE DE PLAQUE LATÉRALEVoir la figure 25. CORRECT - 80° - Obtenu automatiq
Page 22 — Françaisseringue, une fois par semaine. Retourner le guide et s’assurer que les trous de lubrification et la rainure de chaîne sont propres
Page 23 — FrançaisGARANTIEÉNONCÉ DE LA GARANTIE LIMITÉETechtronic Industries North America, Inc., garantit à l’acheteur original que ce produit RYOBI
Page 24 — FrançaisNOTES
Página 3 — EspañolADVERTENCIA:Lea y comprenda todas las instrucciones. El incumplimiento de las instrucciones señaladas abajo puede causar descargas
Página 4 — Españolun cordón de extensión polarizado. La clavija entra sólo de una forma en el enchufe de un cordón de extensión polarizado. Si la cla
Página 5 — EspañolAl recoger o sostener la unidad no sujete las hojas de corte expuestas ni los filos de corte.Corte solamente cuando al visibili
Página 6 — EspañolLas siguientes palabras de señalización y sus significados tienen el objeto de explicar los niveles de riesgo relacionados con este
Page 5 — EnglishSPECIFIC SAFETY RULESDo not operate the saw with one hand! Serious injury to the operator, helpers, bystanders, or any combination
Página 7 — EspañolEs posible que se empleen en este producto algunos de los siguientes símbolos. Le suplicamos estudiarlos y aprender su significado
Página 8 — EspañolHay un cordón de extensión adecuado disponible en un centro de servicio autorizado.Se puede hacer un nudo para atar el cordón de ex
Página 9 — EspañolTAPA DE ACEITECARACTERÍSTICASFAMILIARÍCESE CON LAS TIJERAS DE PODAR ELÉCTRICASVea la figura 2.Para usar este producto con la debida
Página 10 — EspañolDESEMPAQUETADOEste producto requiere armarse. Extraiga cuidadosamente de la caja el producto y los accesorios. Asegúrese de que e
Página 11 — EspañolARMADOINSTALACIÓN DE LA MANGO DELANTEROVea las figuras 3 y 4.Instale el mango delantero de manera que el lado corto del mango qued
Página 12 — EspañolTAPA DEL TANQUE DE ACEITEINDICADOR DE NIVEL DE ACEITEPELIGRO:Nunca couper cerca de líneas de corriente, cordón eléctrico o de otra
Página 13 — EspañolNOTA: Las tijeras de podar viene de la fábrica con la barra y la cadena sin aceitar. También se debe verificar el nivel después de
Página 14 — EspañolSUJECIÓN DE LAS TIJERAS DE PODAR Vea la figura 7.La unidad dispone de un mango delantero y uno trasero. Teniendo la hoja apuntando
Página 15 — Español Las ramas pueden caer en direcciones inesperadas. No se pare directamente bajo la rama que esté cortando. Corte en varias etapa
Página 16 — EspañolADVERTENCIA:Al dar servicio a la unidad, sólo utilice piezas de repuesto idénticas. El empleo de piezas diferentes puede causar un
Page 6 — EnglishSYMBOLSThe following signal words and meanings are intended to explain the levels of risk associated with this product.SYMBOL SIGNAL
Página 17 — EspañolMANTENIMIENTOAPPROX 1,25 mm(0,050 pulg.)en la parte inferior de la barra guía, la cadena se siente bien ajustada en la barra, y pu
Página 18 — EspañolMANTENIMIENTOsuelta el mango para fijar la mordaza inferior en la posición abierta. Retire el perno de la cubierta de la cadena u
Página 19 — EspañolTAPA DEL TANQUE DE ACEITE Vuelva a colocar la mordaza inferior en la posición cerrada tirando del mango delantero y permitiendo q
Página 20 — EspañolNOTA: Al cambiar la cadena, inspeccione la rueda dentada de impulsión para ver si tiene desgaste o daños. Si hay señales de desgas
Página 21 — EspañolÁNGULO DE LIMADURA DE LA PLACA SUPERIORVea la figura 24. ÁNGULO CORRECTO: 30º - Los mangos de las limas están marcados con
Página 22 — EspañolLa formación de minúsculos surcos y protuberancias en los rieles de la barra es un proceso normal de desgaste de la misma. Tales f
Página 23 — EspañolGARANTÍADECLARACIÓN DE LA GARANTÍA LIMITADATechtronic Industries North America, Inc. garantiza al comprador original al menudeo qu
Página 24 — EspañolNOTAS
9900007289-23-13 (REV:02)OPERATOR’S MANUAL / ELECTRIC LOPPERMANUEL D’UTILISATION / ÉBRANCHEUR ÉLECTRIQUEMANUAL DEL OPERADOR / TIJERAS DE PODAR ELÉCTRI
Page 7 — EnglishSome of the following symbols may be used on this product. Please study them and learn their meaning. Proper interpretation of these
Page 8 — EnglishA proper extension cord is available at an authorized service center.It is possible to tie the extension cord and power cord in a kno
Page 9 — EnglishPRODUCT SPECIFICATIONSChain Lubricant Tank Capacity ......2 oz.Bar Length ............
Produits connexes et manuels pour Outils électriques Ryobi RY43200


 (36 pages)
© 2020, manymanuals.fr. Tous droits réservés | 0.136 s |
 Manymanuals.com
 Manymanuals.de
 Manymanuals.fr
 Manymanuals.it
 Manymanuals.pl
 Manymanuals.cz
 Manymanuals.es
 Manymanuals-pt.com
Commentaires sur ces manuels